Skip to content


Plans – Raspberry Trellis

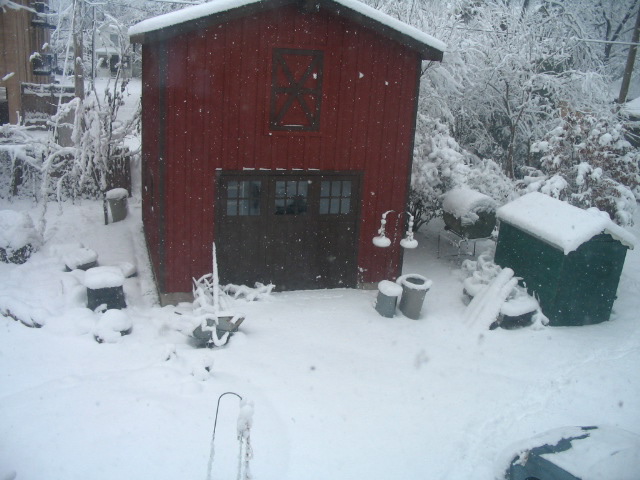
It’s snowy, cold and the only thing growing in our 20minute garden are the icicles hanging from the storage barn. It’s the perfect time to build something useful, like the trellis I made a couple years back for our black raspberry canes.
rasptrellis.JPG
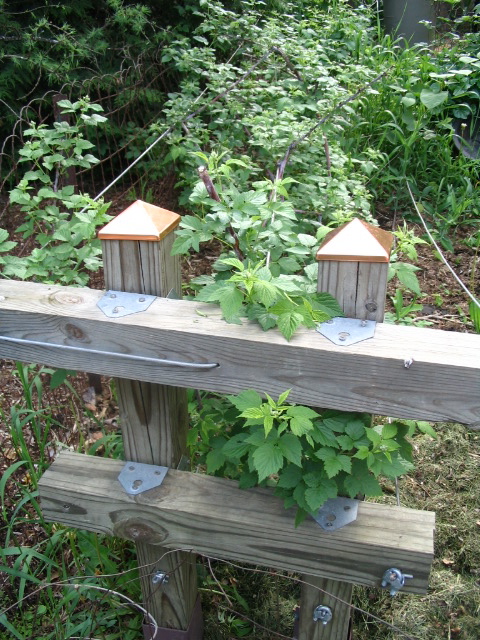
The reason why I wanted a trellis is to keep the tips of the canes from touching the ground. Raspberry canes will sprout roots and eventually will create a new plant if the tips touch the ground. I’m already pushing the limits of how many plants I can keep healthy in a small amount of space. Plus, if the canes aren’t pointing upward, I can’t see them to prune and thus encourage more fruit.

This trellis was built entirely of scavenged wood plus a couple pieces of hardware that made the task MUCH easier than I expected. Normally I despise traditionally treated lumber but I made an exception with this project because the wood will never actually touch the soil, plus since I had scavenged it, I rationalized that most of the surface chemicals had already washed off. Having said that, BE EXTREMELY CAREFUL with the sawdust. Don’t breathe it and be very careful to collect the sawdust and discard it properly. DON’T COMPOST IT.

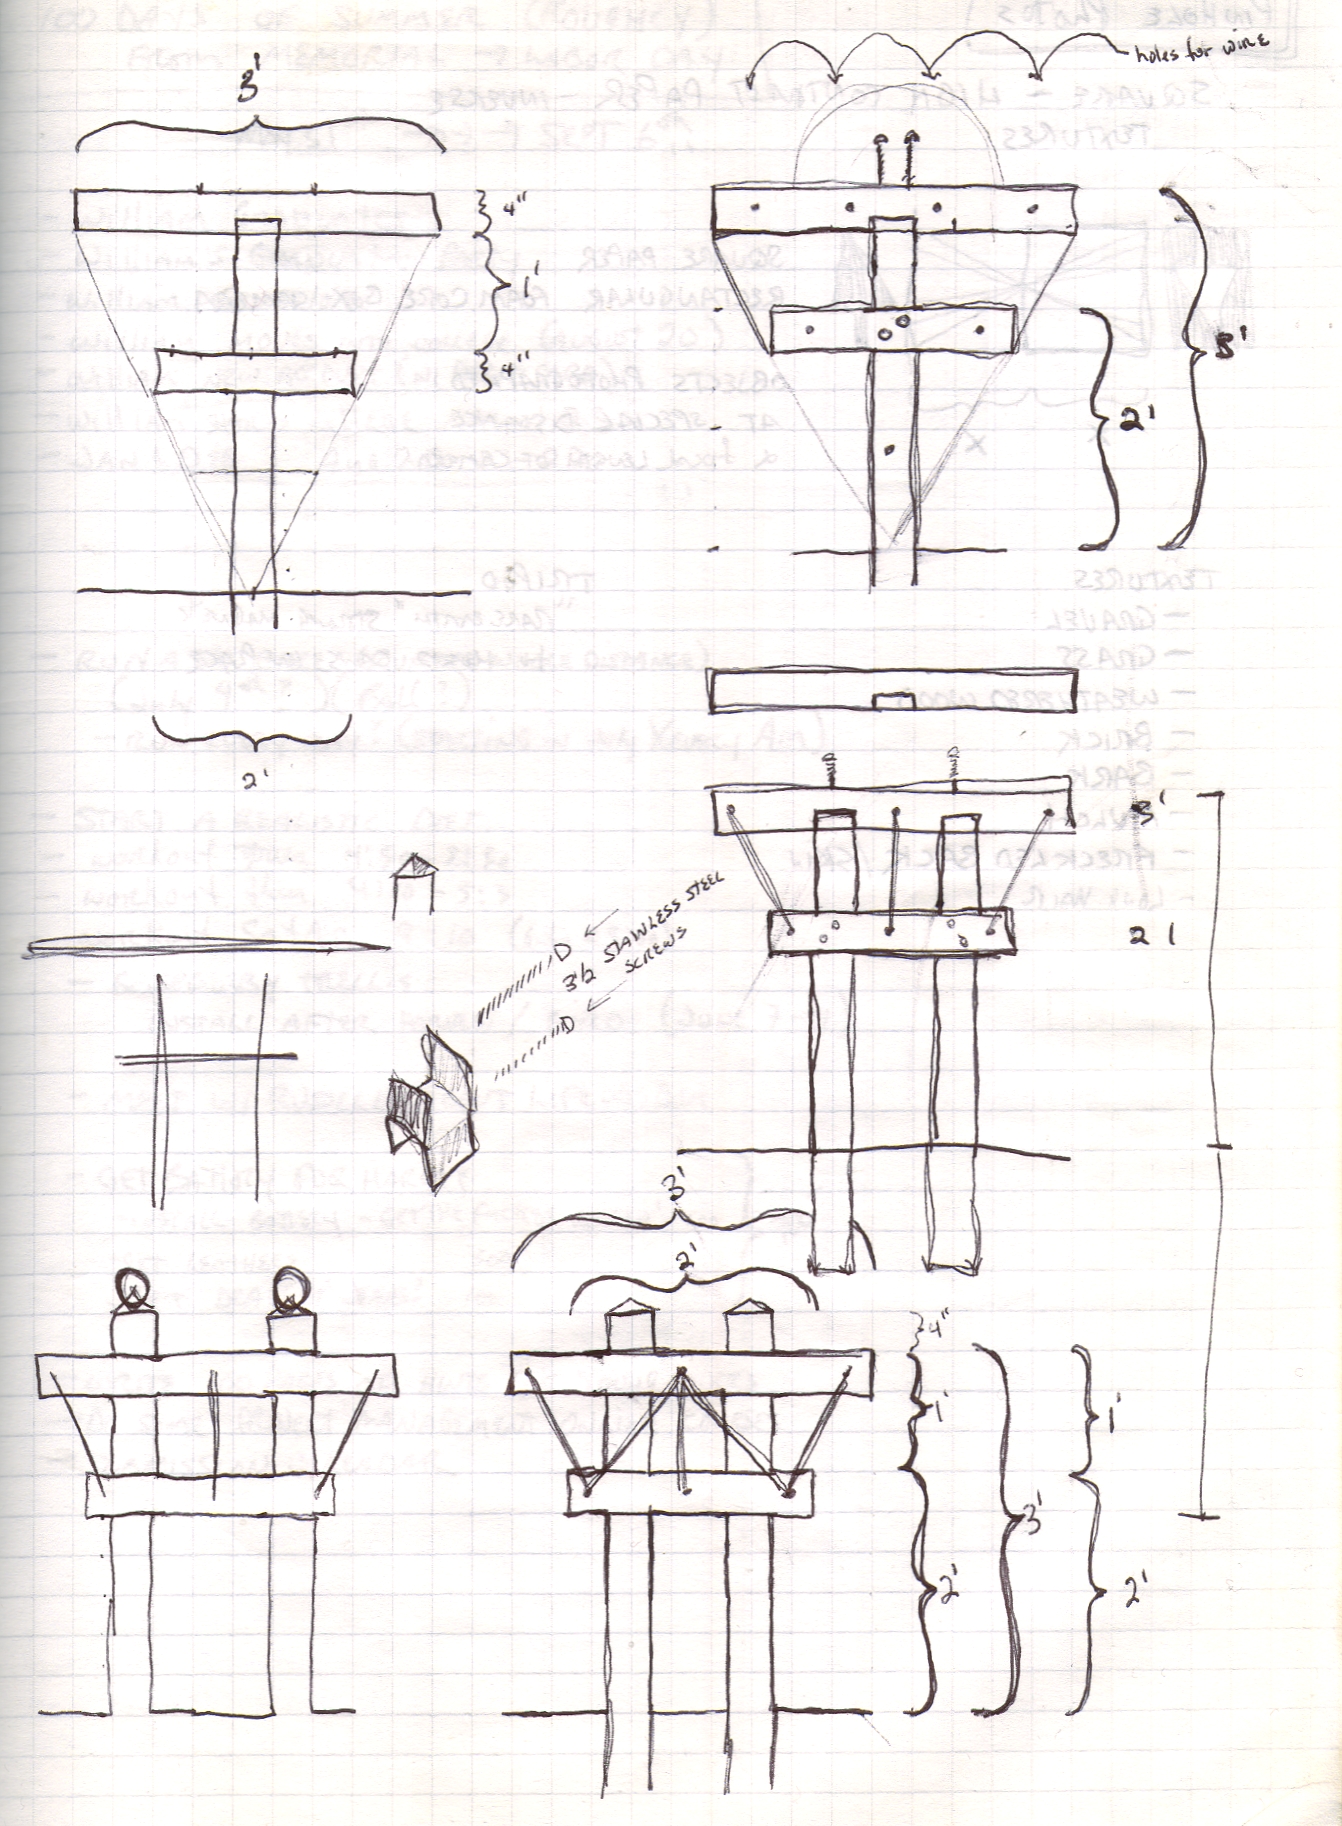
I am including a sketch of my actual trellis as built plus a page of scribbles I made as I was working toward the final design. Don’t just build what I did. Think about it a moment and you probably will come up with something that suits your tastes better. My design is obviously based heavily on telephone pole because the line that support the canes reminded me a lot of telephone lines.
TrellisSketch
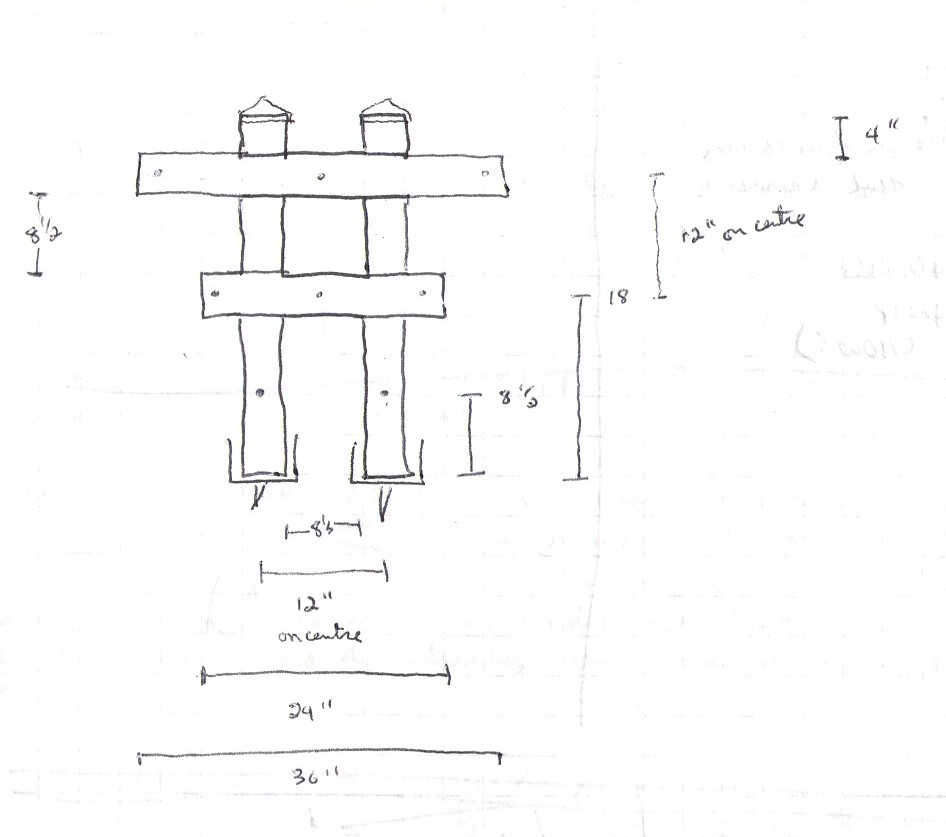
The cut list for my design is:

4×4’s (for BOTH trellises)
• 4 vertical posts @ 36″
• 2 upper horizontal supports @ 36″
• 2 lower horizontal supports @ 24″

Hardware:
• 8 galvanized 4×4 fasteners (used for fastening deck posts perpendicularly);
• lots of stainless steel screws (pre-drill!) The kind of fasteners I used required 12 screws apiece;
• enough plastic coated clothes line for the number of holes times the length of your bramble bed;
• 4 of those cute copper fence toppers. (This solved a couple problems not the least of which was an UGLY cut I’d made on a couple of the posts. Also, they divert rain from pouring right down the most vulnerable side of the post. And they look cool;
• 4 “spiked post holders” for lack of a better name. They hold a 4×4 and helped me avoid having to use a longer post and bury half of it in the ground. Another trouble with a buried post is they are wont to rot out, just around the 6 or 8 inches where soil contacts the post. Lower down, there’s no oxygen and higher up, it’s not constantly wet. The concern I had using these spiked post holders was that they seemed to be designed for structures where most of the stress was applied directly downward, that is, not torqued, that is, they would most definitely NOT be good for a fence of any height. Since the weight of the canes and wires is negligible, I thought I’d give these a try. So far they’ve been pretty good, though I won’t discount the contribution of our thick clay soil.

TrellisScribbles

Posted in • Making.

Tagged with , , .


Compost Containers

If you are planning to start composting in your yard, the first thing you’ll need is a container of some sort.

Actually, you don’t even need that. If you want to do the lowest tech-style of composting, you can create a compost pile. The main advantage is absolutely no cost. You could start one today. The disadvantages are more plentiful. A pile is unprotected from the local animals, who might be surprisingly interested in your compost. The other disadvantage is that a pile decomposes more slowly than a container.

Before purchasing a container, you might want to check with your city or other local municipality to see if they offer subsidized composters for sale. City governments have caught onto the fact that helping residents to compost kitchen and yard waste will save a lot on waste disposal expenses, compared with the costs of adding those items to the local landfill.

A simple composter made of dark durable plastic with a locking lid and some ventilation is a really easy way to get started with composting. Several models are even available from Amazon, with free shipping to boot.


Either of these would be a welcome addition to my yard.

If you are a little bit handy, you can make your own compost container pretty easily. Four wooden pallets attached at the corners can create large square compost area. Unless you have a lot of yard waste though, you might need a long time to fill it up. I’ve also heard of people using old window screens to make a smaller compost container. One of our previous composters was a length of chicken wire attached to 4 stakes. If you fashion your own container, you’ll want to allow for ventilation and some portability in the future.

Ideally, you should place your composter in a handy place, although you might not want it to be the centerpiece of your garden. We traditionally place ours along the back fence. Late this fall, however, we had the good sense to move our empty compost to the middle of the yard so we wouldn’t have to make as long a trek through the snow to empty our kitchen waste.

Posted in • Growing.

Tagged with , , .


Composting in Winter

People tend to think of composting as a summer activity, if they think of composting at all. In our 20 minute garden, we are thoroughly committed to composting year ‘round, and it’s among the easiest resolutions to make— far easier than promises to exercise daily or eliminate a bad habit.

Here are my top three reasons for composting:

Caring for the earth. Maybe that sounds a little hokey, but, seriously, every bit of kitchen waste that we compost goes back into the dirt as opposed to into a plastic bag for a couple thousand years. The more we compost, the smaller our weekly garbage output. Composting is just the next simple step up from recycling.
Focusing on nature. One thing I truly appreciate about gardening is that it keeps me in touch with all things green and growing out in our yard during spring, summer, and fall. In stark contrast, winter in Michigan is a very nice time to spend indoors. Composting keeps the life cycle fresh in my mind.
Free fertilizer. Finished compost is an excellent substance to add to your soil. At no cost, you can enrich your soil, making clay soil lighter and light soil richer over time. You can give your seeds and plant sets a head-start.

In my next post, I’ll talk about how very easy it is to begin composting.

Posted in • Growing.

Tagged with , .


Winter Garden

It’s been a blustery, snowy winter so far in Michigan. We’ve had more than one picturesque snowfall. The newly-painted barn looks particularly lovely and sturdy!

wintergarden.JPG

The snow on January 1st was the wonderful sticky kind that piled up on and coated every surface, including the famed 100 year old lilac.

wintergarden2.JPG

How can we continue to call it a garden, with so much snow, you might wonder? Does a garden imply green growing things, not piles of white fluff? It’s still a garden because of our memories of growing seasons past and our hopes of sunshine and seasons to come. We know what lies under the snow so it’s still a garden. Oh, and because of this:

wintergarden3.JPG

All hail, King Kale! Snow-defying edible wonder! We marvel at your hardiness and welcome you to the dinner table still.

Posted in • Growing.

Tagged with , .


Indoor Gardening: Bean Sprouts

Growing beans sprouts all year long is easy. The only challenge is remembering how easy it is to grown your own sprouts. We especially like to grow sprouts during the winter time.

sprout.JPG
The requirements are very simple. You’ll need a wide-mouth quart-size canning jar, a ring that fits, a piece of cheese cloth and a tablespoon of mung beans. Put the mung beans in the jar, cover with the cheese cloth and twist on the ring. (I bought a nifty little round piece of screen that works well in place of the cheese cloth.) Rinse the seeds thoroughly with cool water. Drain them well. And set them aside for 8 to 12 hours. Repeat the rinsing and draining process. That’s pretty much all you need to do. The indirect light of a kitchen window provides enough sunshine for the soon-growing seeds.
jar.JPG

Small sprouts will emerge usually within 24 hours. We usually let ours grow for 6 to 8 days in order to generate enough sprouts for a delicious meal of Egg Foo Yung.

fulljar.JPG

Egg Foo Yung, basic recipe

• 2 cups of bean sprouts, rinsed and chopped a bit
• 1 teaspoon salt
• 6 eggs, well beaten

Combine the bean sprouts, salt and eggs in a bowl. Heat 2 Tablespoons of oil in a skillet. Fry by 1/4 cupfuls. Keep patties in shape by pushing egg back into the patty with pancake turner. When set and brown on one side, turn and brown other side. Serve hot with rice and sauce.

Variations

There are many easy variations on the basic Egg Foo Yung recipe. What we have on hand determines what else goes in. We also enjoy adding one or more of the following:

• 1/2 cup finely chopped onions or scallions
• 1/4 cup finely diced celery
• 1/2 pound of left-over ground beef, pork, chicken or shrimp. If raw, saute first and add to the egg mixture.

Sauce

We don’t care for the gravy traditionally served with Egg Foo Yung at many Chinese restaurants in the US. Instead we mix equal amounts of soy sauce, mirin, and rice wine vinegar to make a thin sauce that’s also good for dipping dumplings.

pattyjpg.JPG
We sometimes get out of the habit of sprouting seeds. Getting back on track with sprouting beans is very easy however. It’s a great activity to do with children too because the results are very quick and pretty amazing actually. Sprouting seeds is an easy and fun way to eat something fresh and homegrown, even in winter.

Posted in • Cooking, • Growing.

Tagged with , , .