Skip to content


Goodbye, Mr Sun Chips Compostable Bag

Last week, Frito-Lay announced rather quietly that the company is discontinuing the use of their compostable packaging on all but one of their SunChips flavors. Frito-Lay had launched the biodegradable bag about a year and a half ago, with a lot of fanfare and promotion. The fully-compostable material in the bag was said to break down in about 14 weeks.

I first assumed that the reason Frito-Lay would stop using the bags might have something to do with the failure to decompose in a timely manner. It turns out, however, that consumers complained about the noise. The unusual material of the bags makes them very rigid and pretty loud. In addition, SunChips sales have declined by 11% in the last 52 weeks. Our household’s increased interest in SunChips wasn’t enough to counter that trend.

As gardeners, we’re big fan of composting so I watched for the compostable bags to appear in the grocery store. After we took care of the chips inside, we put the bag in our compost bin around March 24. In late June after about 12 weeks, the compostable bag had definitely changed, but it was still there. In October, which would be close to 26 weeks, I moved the bag from that compost bin to the compost tumbler, which tends to be hotter and break materials down more quickly. I’ll continue to monitor the decomposition process.

Although I’m not giving up on the SunChips compostable bag yet, I’ve had better luck with other compost experiments. I’ve successfully composted an old straw hat, an old hemp shower curtain, and an old denim shirt (without the buttons, of course). I have a very worn out leather wallet of Jim’s that will be part of my next wave of compost experiments.

I’m disappointed that consumers didn’t embrace the SunChip compostable bag more enthusiastically. A little noise with a compostable bag seems a small sacrifice when compared to a quieter plastic bag that will linger in a landfill for generations. Much of what we buy – both the products and the packaging—moves through our lives with little thought, but those items or packages don’t disappear when they are no longer in our homes. The noise served as a little reminder of the convenience we take for granted.

Posted in • Growing.

Tagged with .


Sage Pesto is Autumn Delight

As many kitchen gardeners know, sage is an easily grown perennial herb. Even our Michigan climate, a sage plant will almost always survive the winter and thrive again in the spring. Sage plants can get quite large, growing 1-2 feet tall and 2-3 feet wide. In the mid-summer, the plant has lovely spikes of blooms ranging from pink to a deep purple-blue. Sage is happiest with adequate sun and warmth– and without over-watering. Frequent harvest and pruning are also good for sage plants. The plants produce many leaves, which are good for uses other than just flavoring the stuffing for the Thanksgiving turkey.

Recently, I came upon a recipe for Sage Pesto, and I was immediately intrigued. We make and eat a lot of basil pesto but a pesto made from sage was news to me.

I found this use for sage during our occasional vegetarian experimentation revival so the particular recipe from Skinny Bitch in the Kitch: Kick-Ass Recipes for Hungry Girls Who Want to Stop Cooking Crap (and Start Looking Hot!)“ by Rory Freedman and Kim Barnouin was actually vegan. (If a reader can get past their hard-sell veganism and their slangy prose, that reader might discover some fresh recipe ideas.) Their recipes called for soy cream cheese, which we don’t care for, and more olive oil than I thought was necessary. I made my own version, and I served it with frozen mini ravioli for a quick and easy supper. To me, sage pesto has a stronger taste than basil pesto, but it was altogether pleasing in small quantities. I served the sage pesto on the side so we could add as little or much as we desired to the ravioli.

Sage Pesto
(makes approx. 1 cup)

1/4 cup whole almonds
2 cloves garlic
1/4 cup olive oil, plus more for storing
1 cup fresh sage leaves
1/2 cups fresh Italian parsley leaves
4 ounces cream cheese
1/2 teaspoon sea salt
1/8 teaspoon pepper

Pulse the ingredients in a food processor in the order given. Scrape down the sides as necessary and continue pulsing to achieve a uniform consistency.

Serve on hot pasta or use as a tasty spread.

If desired, place sage pesto in a container and top off with olive oil to store.

Now is the time to harvest sage, if you haven’t already done so. A few branches clipped, tied together, and hung in the kitchen dries easily in a week. The sage bough makes a suitable fall decoration and will be ready and waiting for Thanksgiving.

Posted in • Cooking.

Tagged with , , .


Putting the Garden to Bed & Making Gardening Resolutions


A gloriously sunny and warm morning inspired us to begin the task of putting the garden to bed for fall. We made a start of it by concentrating on the large round central bed, which this year contained 6 varieties of tomatoes, 3 types of eggplant and 2 kinds of peppers interspersed with basil plants and surrounded by a thick bushy ring of marigold plants. We took advantage of this opportunity to get things in order before the truly cold days arrive.

All of the tomato plants were spent so Jim pulled them out of the ground. Our late season tomato plants often get what some neighbors call “westside wilt”, which we aren’t sure is a true wilt. Just in case it could linger, we choose not to compost our tomato vines here at home, and instead we put them in the yard bags the city picks up at the curb for their hotter composting. While Jim clipped the tomato plants, we kept our eyes open for red or green tomatoes that might be salvageable. We gathered a couple of bowls full of odds and ends to sort and wash. We mulched the bare spots in the garden beds with grass clippings and chopped leaves, and we’ll add more leaves as we rake them up.

I examined the basil plants and decided that there were enough unwrinkled leaves on the plants to make harvesting them worthwhile. I filled a bowl of fresh basil leaves before we pulled up the plants and composted them. After the leaves were washed and dried, I spread them on trays and baked in the oven at 120 F until they were completely dry. We added a jar full of homegrown organic basil to our spice rack.

While we worked, we talked about what we were happy with this year and what we’d like to do differently next year. We call this making our gardening resolutions. Before we started blogging, Jim kept gardening records in a spiral notebook. Blogging has made it easier to keep track of our successes and our future plans.

Here’s some of our resolutions for next year:

1. Plant sunflowers.
For many years, we put a stand of sunflowers in the center of our garden. This year, we dropped the ball on planting the sunflowers seeds at the right time, that is, when we could still get to the center. Next year, we’ll have sunflowers again.

2. Experiment with garden layout.
We have a roomy but somewhat shady spot where the squash have not done well. Next year, we think we’ll plant some kale in the area and see how it does.

3. Stake everything.
This one appears on all of my gardening resolution lists. Some years I’ve done better than others at keeping my plants and their bounty off the ground, but there’s always room for improvement. Next year I’ll do better.

That belief is what keeps me gardening year after year. What keeps you gardening? What are some of your gardening resolutions for next year?

Posted in • Growing.

Tagged with , , , .


How did your 2010 garden grow?

Broccoli and Kale


I was talking about gardening recently with one of my gardening-type neighbors while we stood in my backyard. I looked around at my thriving but still-needing-attention plants and started into my “would have, should have, could have” list. I had made a lot of pesto this year, but I could have made more. This summer’s tomatoes were great, but we would have had a higher yield if we’d staked them up sooner. And how had we forgotten–we should have planted green beans too!

My neighbor’s reply was “But look at all you did. It is good to get anything done.”

Pumpkins climbing up the fence

Gardening is always a study in risk. The weather and the seasons are unpredictable, especially it seems here in Michigan. Nearly recording-setting temperatures or much higher-than-usual rainfalls— we don’t know what is coming until it gets here. We can’t be sure whether it will be a good year for tomatoes or a lousy one, Farmer’s Almanac predictions aside. The whole process has an uncertain outcome but is potentially full of rewards. We can plan carefully and work hard to make our gardens lovely and productive, but at least some results are out of our hands no matter what we gardeners do. We have to give ourselves credit for our efforts as well as our harvests.

When contemplating the gardens of 2010, take time to take stock of your gardening successes as well as your dreams and plans for improvements next year. We invite you to take a stroll through your garden –physically or mentally– and tally up what you’ve got to be happy about.

What were you most pleased with in your garden this year? Which crop or plant exceeded your expectations? For what in your garden was 2010 a great year? Whatever joys you find in your garden, now is the season to celebrate them.

Posted in • Growing.

Tagged with , .


Chilis Rellenos Made with Corno di Toro Peppers

Corno di Toro Peppers

One enduring characteristic of Jim is his love of hot peppers. Each year in the garden, we plant some old favorites and some new experiments. Jalapenos are standard, but new this year was the corno del toro, the bull’s horn peppers. We were told that they were sweet red peppers. My heat tolerance has increased over years of exposure to eating peppers, but I would call the corno del toro a “sweet, but slightly hot, red pepper.”

All of our pepper plants grew quite tall this summer. They really needed staking to keep the plants upright and the many peppers themselves off the ground. Growing hot peppers is usually easy because they do not seem to have a lot of enemies. The neighborhood squirrels and the skunk who sometimes take a sample taste of low-hanging tomatoes or eggplant do not bother the hot peppers at all. That’s true for most insects as well.

One result of growing a lot of peppers is needing to find ways to eat them. We adore salsa, but we grow enough peppers to make gallons of salsa, and, if we are not careful, the salsa will be too hot for most mortals to enjoy.

At some used book store years ago, we picked up Hot and Spicy and Meatless in two volumes by Dave DeWitt, Mary Jane Wilan, and Melissa T. Stock. From this book, we learned to make Chili Rellenos Casserole. It’s a simplified version of stuffed chilis that is delicious and not difficult, as well as not being deep-fried. This year, since we did not grow the poblano peppers traditionally used in chili rellenos, I decided to experiment with our corno del toro peppers to see if they would make a suitable pepper for the dish, and I was very happy with the results. Again, the casserole is a little spicy on my personal scale of spicy and does not fall into the category of “too hot to enjoy.” Here’s the recipe as well as tips on roasting peppers at home.


Roasting Peppers

Preheat the broiler. Meanwhile, wash and dry off peppers. Place them on a cookie sheet and under the broiler. Hover nearby. In 2-3 minutes, check to see if pepper skin is starting to char slightly on the top. If so, turn peppers to achieve a slight char on 3 or 4 sides, depending on the shape and cooperation of your peppers. Move around and reorganize peppers on the tray to get even results.

Note: if you are working with hot peppers or have sensitive skin, you may wish to wear gloves.

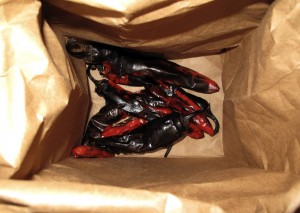
Then pop the hot peppers into a medium-sized paper bag and roll the edge down. Let peppers steam inside and cool off for 20 minutes or so. When peppers are cool enough to handle, remove them from the bag.

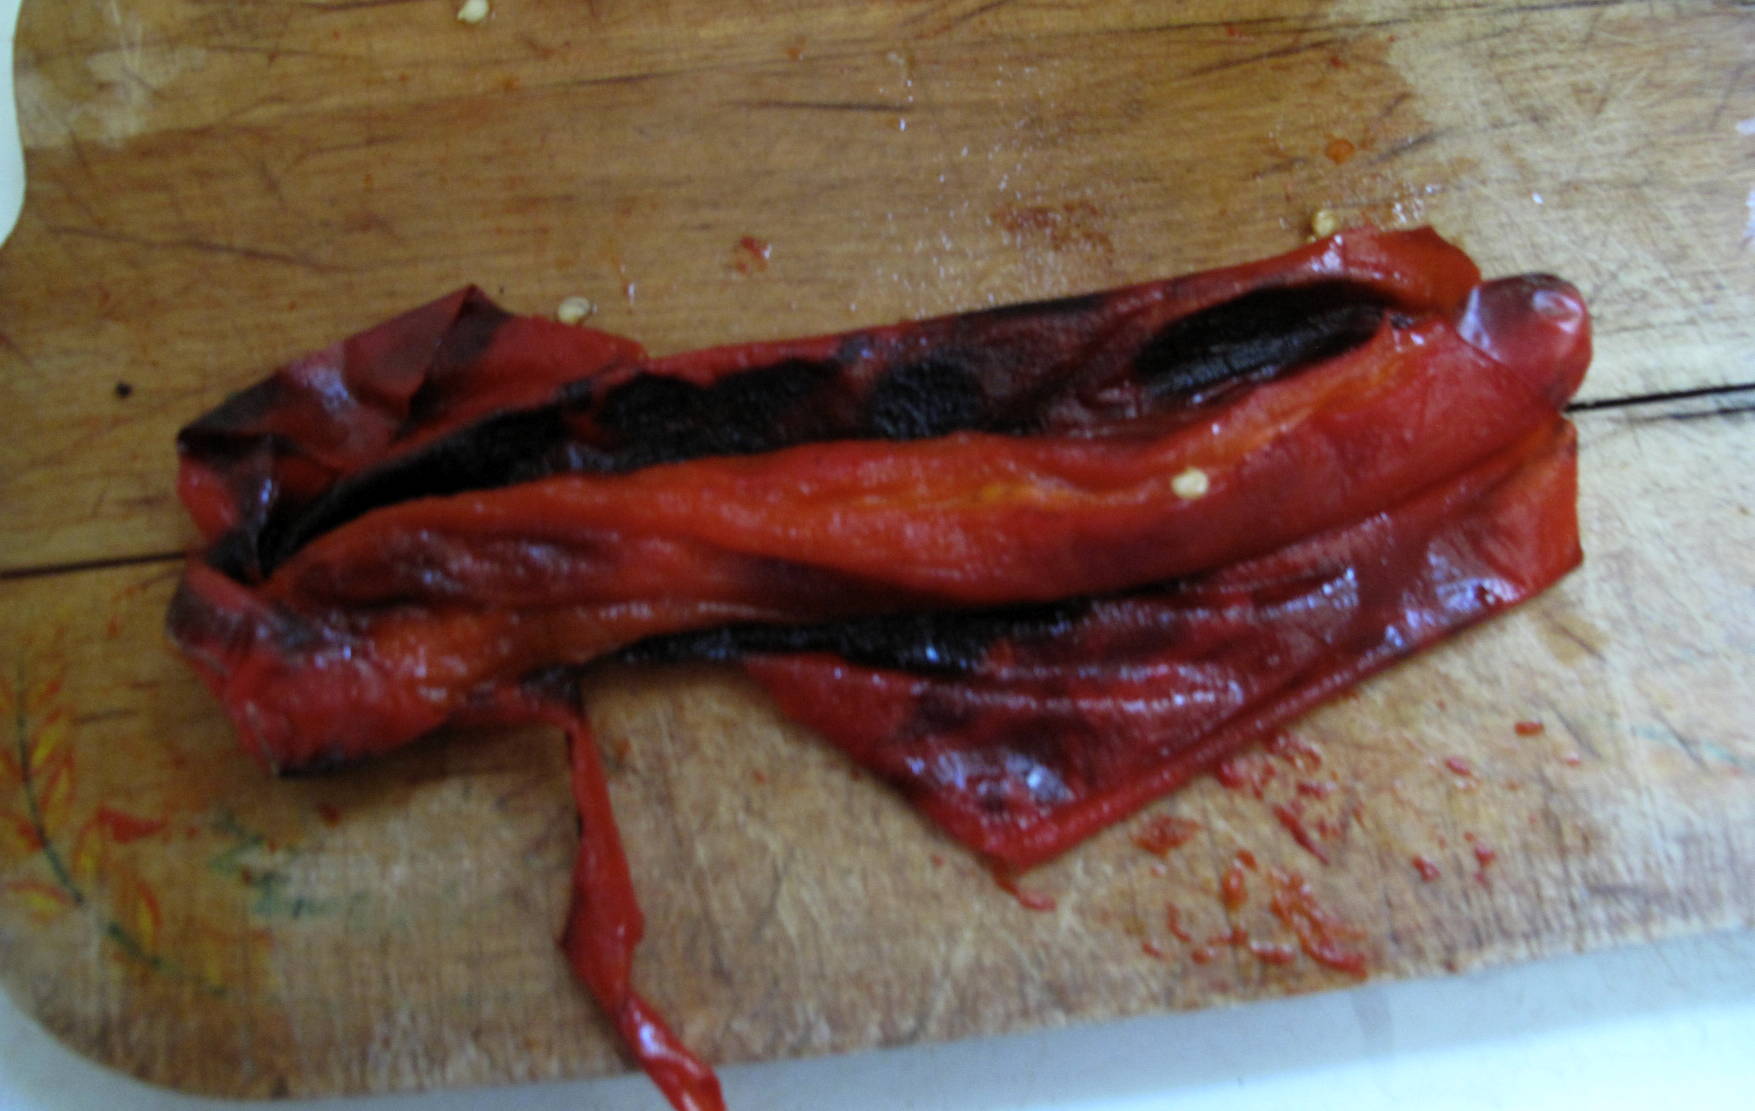
Gently roll the pepper skin between your fingers; you’ll feel the papery outside skin separate from the inner wall. Loosen and remove the skin. Then carefully pull off the stem and slit the pepper down one side. Lay the pepper flat on a board and open the sides to make a single, flat layer. Use a spoon to scoop out the seeds and any white membrane. Another way to remove the seeds is to hold the pepper under slow-running water; I find it a little hard to hold onto the slippery pepper and slide out the seeds at the same time. Either way, your goal is an intact pepper without any skins, seeds or breaks– as much as possible anyway– and handling the peppers gently is the key.


If you have 7 or 8 prepared peppers, try the recipe below.


Chili Rellenos Casserole

Ingredients:
2 tablespoons vegetable oil
1 small onion, chopped
2 cloves garlic, minced
7 corno del toro peppers or pobano peppers, roasted, peeled, stems removed
1/2 pound queso fresco cheese
1 cup grated chedder cheese
3 eggs
1/4 cup flour
3/4 cup milk
1/4 teaspoon salt


Directions:
1. Sauté the onion and garlic in the oil until soft, about 4 minutes. Remove from the heat and set aside.
2. In a greased 8″ x 8″ casserole dish, place a layer of chilis, side by side, then a layer of crumbled queso fresco cheese, then another layer of chilis. Sprinkle the cheddar cheese on top.
3. Beat the eggs with the floour until smooth. Add the milk, salt, and onion mixture; mix well. Carefully pour this mixture over the chilis.
4. Bake uncovered for 35 minutes at 350 degrees or until a knife inserted int eh custard top comves out clean and the casserole is lightly browned. Remove from the oven and let the casserole cool for 5- 10 minutes before cutting it with a very sharp knife.

This recipe makes a pretty and tasty dish. The custard tempers mildly hot peppers and will warm you up on cool fall days.

Posted in • Cooking.

Tagged with , , , .