Skip to content


Before and After: What 20 Minutes Looks Like (7) – The End Cap Bed

IMG_5989

Our gardens are divided into beds distributed around the property. Our design was to have the kitchen gardens integrated into the yards, rather than having one big rectangular plot, so we have squares and circles and pathways between. This gives us lots of flexibility with planting, with plot rotation, and with indicating which bed we are talking about because they all have different names!

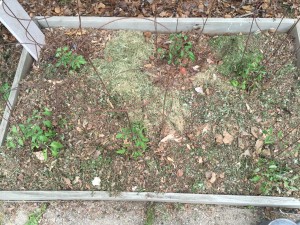
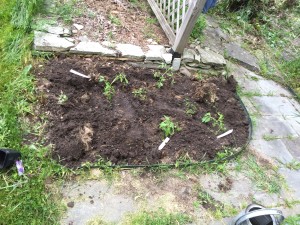
This year, I decided to put tomatoes in the End Cap bed, where we have not grown them before. The bed is about 3 feet wide by 2 feet deep. In my book, that’s big enough for 6 tomatoes and a couple of basil around the perimeter. Keeping the individual plant’s growth habits in mind, we plant our plants closer together and stagger them to discourage weed growth between the plants, practice which come out of the biodynamic French intensive gardening traditions.

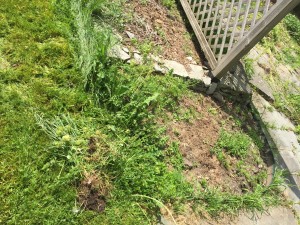
Before planting, some clean up was needed. Weeds had gotten a little bit of a foothold here, so I removed most of those. I think a good way to view weeds is competitors to your plants for nutrition from the soil and sunlight; you want to minimize that competition and give your plants the edge. There’s no need in totally obsessing over weeds however. Do what you can in the time you have. They’ll be back regardless, so you’ll have another chance!

The End Cap Garden "after"

The End Cap Garden “after”

I also wanted to get the tomatoes in the ground as quickly as possible. We have sometimes made the mistake of bringing home more sets than we have time to get planted in a weekend, say. Seedlings do okay in trays, but they really want to be in the soil, deepening their roots and stretching their stalks. Get them in the ground as quickly as possible for the best results all around.

That’s what I accomplished in 20 minutes!

PS: if you haven’t gotten your garden in, it’s not too late! Think small and successful. A half dozen tomatoes and some basil plants make a great little garden. In 20 minutes or so, that could be yours!
Posted in • Growing.

Tagged with , , .


Garden Inventory 2015

Plant Sets

The 2015 Garden is in the ground and ready to grow! Here’s what we’ve planted so far:

Tomatoes:
Cuor di Buoi (Project Grow) — Red — Oxheart — 80 days
Dunneaux (Project Grow) — Red — Paste — late
Costolutto Genovese (Project Grow) — Red — Saladette — Mid
Stupice (Project Grow) — Red — Saladette — Early
Purple Russian (Project Grow) — Purple — Paste — Mid/late
Cherokee Purple (Project Grow) — Purple — Beefsteak — Mid/late. Popular dark tomato; tasty.
Saucy (Project Grow) — Red — Paste — Mid. Extremely productive bush plants
Brandywine Tomato (Farmers’ Market) — 90 -100 days
Roma Tomato (Farmers’ Market) — 76 days
Black Prince (Farmers’ Market) — 70-90 days
Japanese Trifele (Farmers’ Market) — 85 days

Peppers:
Corno di Toro (Farmers Market) — 68-72 days
Jalapeño (Farmers Market)– 65-75 days
Ancho Hot Peppers (Farmers’ Market) — Green 68 days; Red 93
California Wonder (Project Grow) — 70 days
Sweet Pimento (Project Grow) — 80 days
Bull’s Horn Mix (project Grow) — 80 days

Others:
Table Ace Squash (Farmers’ Market) — 70-78 days
Extra Triple Curled Parsley (Farmers’ Market) — 75 days
Raider Cucumber (Farmers’ Market) — 62 days
Little Fingers Eggplant (Farmers’ Market) — 71 days
Waltham Butternut Winter Squash (Farmers’ Market) — 82-97 days
Sugar Baby Watermelon (Farmers’ Market) — 73-86 days
Italian Green Sprouting Broccoli (Farmers’ Market) — 70 days
Santo Coriander (Farmers’ Market)
Gem Marigold (Farmers’ Market)
Disco Red Marigold (Farmers’ Market)
Disco Yellow Marigold (Farmers’ Market)
Large Leaf Italian Basil

Perennials:
Asparagus
Black raspberries
Black currants
Red currants
Horseradish
Rhubarb
Pippen Apple (2)
Roxbury Russet Apple
Strawberries
Sage, thyme, rosemary, lovage, mint…

I’ll add on what I’ve forgotten as I remember!

Here’s to another great gardening season!

Posted in • Growing.

Tagged with , , .


The Challenge of Record Keeping

The Sandbox Bed

The Sandbox Bed

In the excitement of getting plants in the soil, don’t forget to make some notes about this season’s garden for your future self. You might think you’ll remember what varieties were planted or what plants went where, but odds are you won’t; there are just too many details to keep track of! Any method of record keeping will pay off in the short term, when you fall in love with a particular tomato and you know its name, as well as in long run, with plant rotation and next year’s planning– so you can plant that wonderful tomato again! The trick is to keep your notes some place handy so you’ll have them when you need them.

The Sandbox Bed with Labels

The Sandbox Bed with Labels

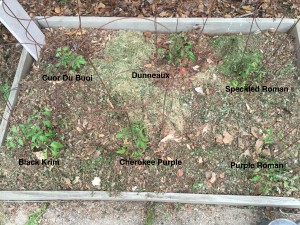
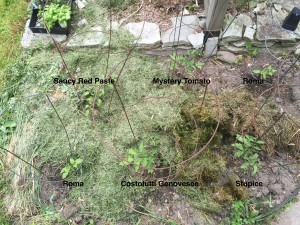
This year, I’m trying a technique I’ve seen other gardeners use successfully: labeled digital photos of each of the garden beds. Given how simple it is to take a good picture with a camera phone and how easy it is to annotate a photo with words, there’s no good reason why I haven’t used this practice before. Here’s the Sandbox Bed with 6 tomato plants of different varieties, all labeled.

I also like this technique better than leaving the plastic tags stuck in the soil. Those tend to get covered with mulch or moved away from the right plant or lost altogether.

The End Cap Bed Labeled

The End Cap Bed Labeled

For years, we kept a paper gardening journal, which was also handy for making notes and record keeping. It was also fun to look over our garden history and remember what we learned and grew. Even now, pen and paper are the quickest way to jot down garden plans and kept track of what was planted where. Those paper notes are easy to lose however, so I’m going to be doing more digital record keeping this gardening season.

Posted in • Growing.

Tagged with , , .


Support the Ypsilanti Farmers’ Market — NOW!

Help put a roof on the Tuesday Ypsilanti Farmers’ Market to make it weather-resistant and year-round. Contribute at Patronicity NOW to help Growing Hope get a $65,000 matching grant.

Jan and I are big-time kitchen gardeners but even we don’t grow all our own vegetables. We’d need an acre or two just for the onions we consume. Thank goodness for farmer’s markets like the Ypsilanti Farmers’ Market. We’ve hit the Tuesday Farmer’s Market right in downtown Ypsilanti off and on for the past year and are always impressed with the variety of goods and the zeal of the vendors. Since this is Michigan, however, the Tuesday Farmer’s Market only opens in May and the first few Tuesdays so far this year have been rainy. We were over-joyed to hear about Growing Hope’s plans to build a permanent structure. Help make this facility a reality with a couple bucks and if you do so this weekend, the project can get a matching grant which will make your contribution go twice as far. They’re offering some nice perks too. We contributed at the “Kale” level and are getting a tote bag.

I’m embarrassed to admit I learned of this campaign so late, last night in fact, mere days before it closes. Jan and I were milling around the Ypsilanti First Friday festivities, taking in the landscapes and still life paintings of Megan Williamson at the Chin-Azarro gallery, when I spied someone in a full sized pea costume. Life is more interesting when you get a chance to talk to people in costume from time to time so I stuck up a conversation. Though we were late hearing about the campaign, it only takes a minute or two to make a difference.

Take Away Lessons:
— Support Ypsilanti’s Tuesday Farmers’ Market shelter out the elements
— Attend the Ypsilanti First Friday events
— Talk to Giant Peas

https://www.patronicity.com/project/ypsilanti_farmers_marketplace

Posted in • Local Happenings.

Tagged with , , , .


Before and After: What 20 Minutes Looks Like (6) – Back 40

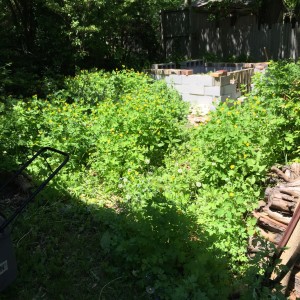
Under those weeds are a compost pile, a couple stumps, some flagstone and a mulberry trunk.

Under those weeds are a compost pile, a couple stumps, some flagstone and a mulberry trunk.

My Uncle Sam was a dairy farmer and referred to the plot of land he tended that was past Black River as “the Back 40” probably because it was 40 acres. We have a Back 40 as well. Someday the north part will be an orchard and the south part, the area with structural shade from the barn, will be a worm ranch. But for the moment, it’s a mess. There’s a felled mulberry trunk that I haven’t chopped up, a pile of stone left over from the path put in by the previous owner and the huge cement block Experimental Compost we erected last fall when we we were offered a windfall of compostables. It’s overgrown and not terribly productive so I didn’t want to spend too long. The right tool for the job was the lawn mower.

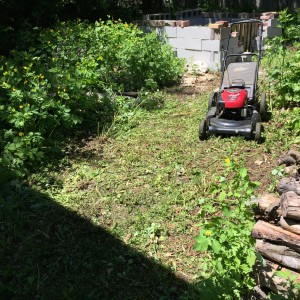
After 20 minutes with a mower and a bit of hand weeding, the rustic contours of this area emerged.

After 20 minutes with a mower and a bit of hand weeding, the rustic contours of this area emerged.

After twenty minutes I was able to level most of these weeds. We’d mulched the area VERY heavily last fall with leaves we’d stolen from our neighbors’ yards. I got distracted weeding around our little outbuilding in an area that can’t bee seen from this photo but generally speaking, mission accomplished. I used the mown clippings as a mulch in the same area. Next time I mow the back 40, I probably won’t collect the clippings at all.

Posted in • Growing.

Tagged with , , .