Skip to content


Frost advisory means time to harvest or cover plants

The National Weather Service has issued a frost advisory for tonight, Sunday, September 23. The combination of clear skies and cold air mass could allow temperatures to fall into the low 30’s with some areas of frost possible after midnight.

This might be the motivation needed to bring in tender potted plants or sensitive house plants that have been summering outdoors. I’ll be bringing in a scented geranium and a rosemary plant which have graced our front porch this summer.

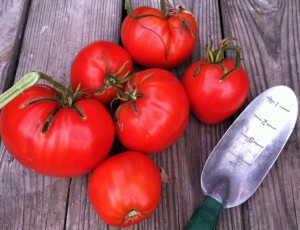
I harvested a lot of tomatoes this afternoon, both fully red or starting to turn. The not-yet-ripe tomatoes are washed and dried, and then introduced to the Magic Tomato Bag. This process will only work with tomatoes who haven’t been touched by frost, so it’s important to act now.

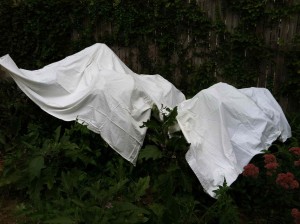
It’s also a good idea to cover any tender vegetable plants whose lives you are hoping to extend. Tomatoes and peppers may survive if frost is kept off of the plants. We use sheets or light-weight plastic to keep the frost from settling on the plants. Again, the idea is to keep the frost from touching the plants so using a fence, trellis or support to keep the cover lifted is a great idea. Remove the covers in the morning so that plants can enjoy the sun.

Hardy plants such as kale, broccoli, and collards as well as fall mums should be just fine. Some folks hold that the flavor of kale and collards is actually improved by frost.

None of these methods are guaranteed. We like to give them a try because there still may be enough warm days ahead to make the effort worthwhile.
Posted in • Growing.


Begin Fall Clean-up Now for a happier spring

Michigan gardening writer, designer, and all-around advocate Janet Macunovich spoke at the most recent meeting of the Washtenaw County Master Gardener Alumni Association. I’ve attended several of her presentations, and I’m always impressed with her knowledge, energy and friendliness; even with 30 number of years in the field, she shares gardening information with an attitude of learning together, that is welcoming and not overwhelming. Her timely topic was “Art of Fall Garden Clean-up: Garden clean-up with an eye for winter beauty”. Macunovich emphasized perennial gardens, but many of the same principles apply to a garden with vegetables, herbs or annuals. I left the meeting inspired and ready to begin the fall clean task, which as Macunovich pointed out is a process, not a marathon.

One major point of her presentation was that gardeners should begin winterizing the garden as the leaves begin to fall– in other words, right now. Beginning the first steps of preparation are easiest when the garden is firm and organized as in fall, and not soggy and messy in the spring. Cutting and clearing plants in the fall also reduces the number of seeds left on the beds and therefore will lead to fewer weeds in the spring. She estimated that every hour spent cleaning up in the fall saves two hours of the same in the spring, and I can see how that number is totally right on. In the spring, weeds have the advantage; they put energy into growing as soon as possible, not when the weather is good enough for us to go out and work. Overall, fall clean up is much less stressful.

The first step is cutting plants down. How do you decide where to begin? Macunovich suggests that you take out what doesn’t look good to you personally. One point she underscored was the need to know your plants’ growth habits; sometimes it’s just a matter of becoming a more active observer in the garden. Does the plant regrow from the old growth or the crown? Since lavender, thyme, and evergreens grow off of old growth, don’t cut them down. If they need tidying up, give them a “hair cut” or trim instead.

Gardeners can leave sturdy plants like ornamental grasses or stonecrop sedum as points of interest in the garden. The choice is up to the individual gardener, based on what she or he likes. Some plants will attract birds, so blackberry lily or globe thistle can be left for that purpose.

Before clean-up begins, tools should be cleaned and sharpened. It’s also important to clean tools as you work, especially if you suspect issues with diseases. Paying attention to the plants’ health as you work will help you notice problems like pests or weeds too.

Macunovich sets a goal of being done with fall clean-up before the heaviest leaf fall. That way, leaves are on top of the garden as mulch and insulation, and they do not have to be cleared out of the way to get to the clean up. Like us, she’s a big proponent of covering the garden beds with a thick blanket of leaves before winter. Those leaves will break down over winter and add more organic matter to the soil.

Cleaning a whole garden as once can be a huge task, but beginning by spending 20 minutes at a time can make the chore much simpler. Taking the garden down in stages allows us to continue to enjoy the still lovely parts as we prepare for winter.

For more gardening information and advice, see GardenAtoZ, a really nice website put together by Janet Macunovich and Steve Nikkila. There, you can see wonderful pictures, subscribe to their newsletter, and benefit from their extensive gardening experience.

Posted in • Growing.


Cleaning up with homemade soft scrub

Many gardeners are motivated to garden organically is because they want to use fewer chemicals in their lives. Chemicals work — thank heavens for antibiotics and sterile environments where they are needed– but in many cases, chemical treatments in a garden or home are an overkill for a problem. I certainly sympathize with any gardeners suffering the disappointment and inconvenience of an insect invasion; it happens to all of us, and I don’t enjoy having my vegetables nibbled by pests either. Much of the time, however, pests can be controlled through integrated pest management, which simply put is a chemical-free system that focuses on knowing the problems to watch for, keeping plants healthy, using plant cover, mulching, and hand picking insects. Truly, killing all insects is impossible and undesirable, from a sustaining life on earth point of view.

We garden organically because it makes the most sense to us and through years of gardening, we’ve seen organic methods work in our own vegetable, herb and flower gardens. For me, gardening organically means learning to tolerate a little more imperfection. It means planting a little extra, realizing that the gardener probably won’t get all the harvest. On the other hand, if no other living things wanted to eat what grows in my garden, that would tell me something about the quality of what I am growing too.

Likewise, inside the house, I’m often looking for ways to lessen the use of chemicals.

One of my big finds a decade back was the book Better Basics for the Home: Simple Solutions for Less Toxic Living by Annie Berthold-Bond. She notes that in past times, families handed down household recipe books, that contained recipes for cleaning as well as recipes for cooking. Her book provides many recipes that use ingredients that are “generally regarded as safe” (GRAS) to make mixtures for housekeeping, skin care, gardening, pets, and hobbies. GRAS substances include things like baking soda, washing soda, vinegar, and borax.

Here’s one of my favorite quick and easy recipes for homemade antibacterial soft scrub cleaner. I like to use it for cleaning the tile and grout in the shower stall.

Antibacterial Soft Scrubber

1/ 4 cup baking soda
1/ 4 cup borax
Enough liquid soap or detergent to make a frosting like consistency
15 drops of tea tree oil

Place the baking soda and borax in a bowl. Add the tea tree oil, then slowly add the liquid soap, stirring all the time, until the consistency reaches that of frosting.

Scoop the mixture with a sponge, wipe the surfaces to clean, then rinse.

This takes about a minute to prepare. Only make what you will use up because the mixture will dry out.

If you are looking for more ways to lessen your use of cleaners and produces with labels like “Poison”, “Warning” or “Caution”, you should check out Annie Berthold-Bond’s Better Basics for the Home book as well as her website.

Posted in • Making.


Sauce tomatoes versus slicing tomatoes: does the difference matter?

One way of categorizing home-grown tomatoes is dividing them into tomatoes for cooking and making sauce and tomatoes for slicing and eating fresh. Are the categories really that different? I think the answer is both yes and no.

For slicing and eating fresh, many people recommend Brandywine, Mortgage Lifter, Cherokee Purple, Black Krim, or Beefsteak tomatoes. These are among our favorites for BLTs, simple tomato salads, or slicing and eating with a bit of salt and herbs.

For the most part, slicing tomatoes are roundish in shape and large, although sizes may vary. These tomatoes are generally quite juicy.

When we make sauce, we like to use Amish paste, San Marzano or Roma tomatoes. Sauce or paste tomatoes tend to be more oval, or oblong, or pear-shaped. They are also considered to be “dryer” having less liquid and more pulp than slicing tomatoes.

Although I tend to use tomatoes along these categories, I’m not hard-edged about it. Some cooks swear by a certain tomato for a particular use, but I like to mix varieties for a more complex taste, whether in making tomato sauce– or apple sauce or pie, for that matter.

Overall, I would argue that home-grown tomatoes are pretty interchangeable (grocery store tomatoes, for the most part, are only worth eating in desperation in January no matter how they are prepared.) Sauce tomatoes will do for a salad or BLT in my book, and big juicy slicing tomatoes also make good sauce, although they will take significantly longer to cook down.

When preparing sauce using tomatoes that have a lot of juice or seeds, you can speed up the cooking process by seeding the tomatoes before cooking. The easiest way I’ve found to do this is the cut the tomato in half along on the equator, as it were, and then gently squeeze with one hand while gently prodding the tomato cavities with a finger. I don’t obsess over seed removal because I run tomato sauce through the food mill after cooking to make a smooth sauce.

The tomatoes are still ripening in our garden, so I’m looking forward to more meals of fresh and cooked homegrown tomatoes. We planted some new-to-us varieties this year, and I was a little uncertain about which was which. The fun and informative Ann Arbor Farmers’ Market blog contained a link to a guide to tomato varieties on Rutgers New Jersey Agricultural Experiment Station, so I have been able to identify the varieties we planted that I’ve been unsure about.

Our home-made tomato sauce has the potential of including about a dozen varieties of tomatoes. I’m not a purist, however, I know our tomato sauce will be red, delicious– and plentiful, I hope.

How selective are you about the ways you use slicing or sauce tomatoes?

Posted in • Growing.


A Day of Tomato Meals, with Recipes

If there were a wacky new rule implemented or a Survivor-style reality show for gardeners where I could only grow one vegetable, I would, without a doubt, choose the tomato. The tomato is the backbone of my garden; it’s the plant that feeds us year round. At the height of the tomato season, we eat as many fresh and lightly-prepared as possible and then can or freeze or dry whatever other tomatoes we are able to spare.

Overall, it’s not been a great tomato year for our garden. The weird weather might be why the plants haven’t thrived, but it’s hard to say exactly which factors are most influential. I wonder if the weather hasn’t also been rough on some of the neighborhood wildlife, specifically squirrels and the occasional skunk, who seem to be nibbling on the fruits of our garden more than usual. I remain hopeful that the season isn’t really over yet and that we’ll have tomatoes ripening for weeks to come.

Still, a great day is one when tomatoes feature at each meal of the day, and we were fortunate to have several of those lately. Here’s some recipe highlights from one typical, tomato-blessed day.

Breakfast: Omelette with tomatoes and onions

There is lots of differing advice about how to make omelettes, but I took several important lessons from Julie Child in an episode of The French Chef. The essential elements are a non-stick pan heated very hot and a short cooking time where the pan is kept moving. She recommended butter whereas I cut calories with cooking spray.

Ingredients (for one omelette)
2 – 3 eggs, beaten
2 Tablespoons onions, previously sauteed
1 small fresh chopped tomatoes, drained
1 Tablespoon parmesan cheese

Method:
1. Heat pan to very hot, then pour in eggs. Tilt pan and swirl as you cook so that the uncooked egg can have contact with the pan (but do not stir). Lift cooked edge with a thin spatula to allow egg to run underneath. (For more details and illustrations, see Mastering the Art of French Cooking by Julie Child et al) The cooking process should take about 1 minute in my opinion, 30 second in hers.
2. Turn off the heat. Add pre-cooked onions and chopped tomatoes. Sprinkle with cheese.
3. Fold over using a spatula and serve as quickly as possible.

Lunch: The Salad We Can’t Stop Eating

We are crazy about this super easy fresh tomato salad. We enjoy using rice wine vinegar in the salad but other types of vinegar can be used for variety.

Ingredients:
3 perfectly ripe tomatoes or 1-2 cups of cherry tomatoes
1/ 4 pound of fresh-style mozzarella cheese (like BelGioioso brand)
2 teaspoons olive oil
2 tablespoons seasoned rice wine vinegar
4 leaves of fresh basil
salt, to taste

Method:
1. Chop tomatoes into bite-sized pieces. If using cherry tomatoes, slice each one in half. Place in bowl.
2. Cut cheese into 1/ 2 inch pieces. Add to tomatoes
3. Drizzle with olive oil and stir gently.
4. Sprinkle on rice wine vinegar and stir gently.
5. Top with basil and salt.

Dinner: Grilled Tomatoes

Grilling tomatoes does not take long at all, and they are an easy addition to a meal. Cook them when the rest of the meal is nearly done.

Ingredients:

4 or more fresh tomatoes
olive oil
salt and pepper to taste

Method:
1. Heat the grill to medium high.
2. Slice the tomatoes in half and place on a tray. Drizzle or brush with olive oil, both on the cut side and the other side. Sprinkle with salt and pepper.
3. Place tomatoes on heated grill until tomatoes start to sizzle and grill marks appear– about 4 or 5 minutes. Turn the tomatoes and grill for another 4 minutes.

Variations on this recipe include adding garlic or herbs.

Sadly, it does not appear that, for us, 2012 will be a “year of too many tomatoes.” These simple recipes and techniques are helping us savor every ripe tomato we harvest.

Posted in • Cooking.